French Opera Cake
Time:
5h
Difficulty:
Challenging
Loot:
2 cakes
You can do this.
Actually, you can ABSOLUTELY do this. But it’s not going to be easy. Depending on what you’ve baked before, this could either be just a matter of “fundamentals applied,” or a hell of a learning experience. Either way, taking on this challenge is gonna help you grow massively as a baker.
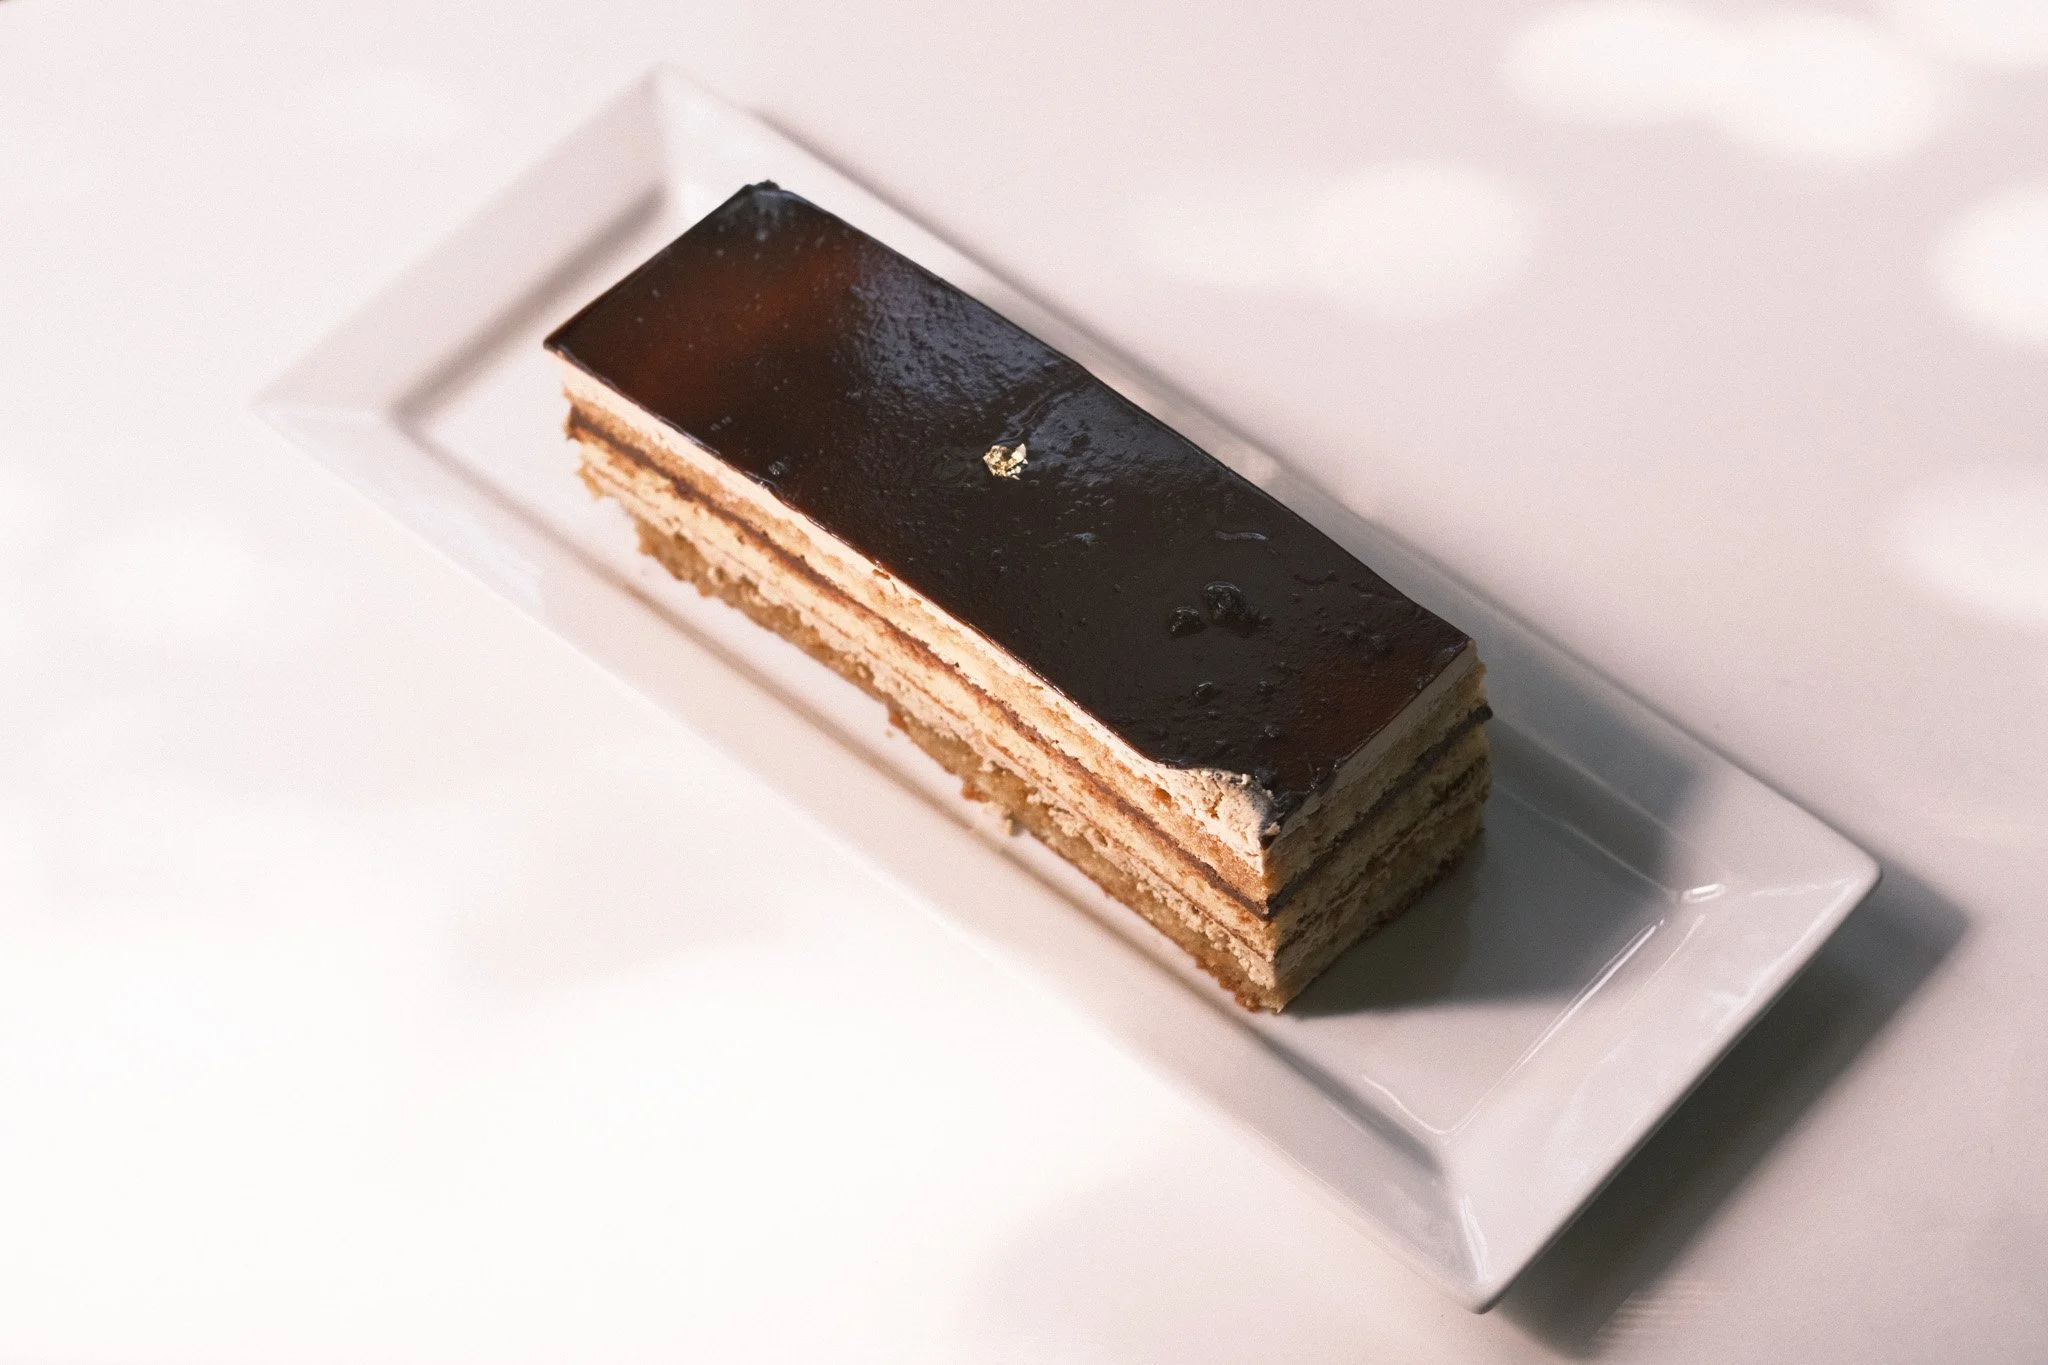
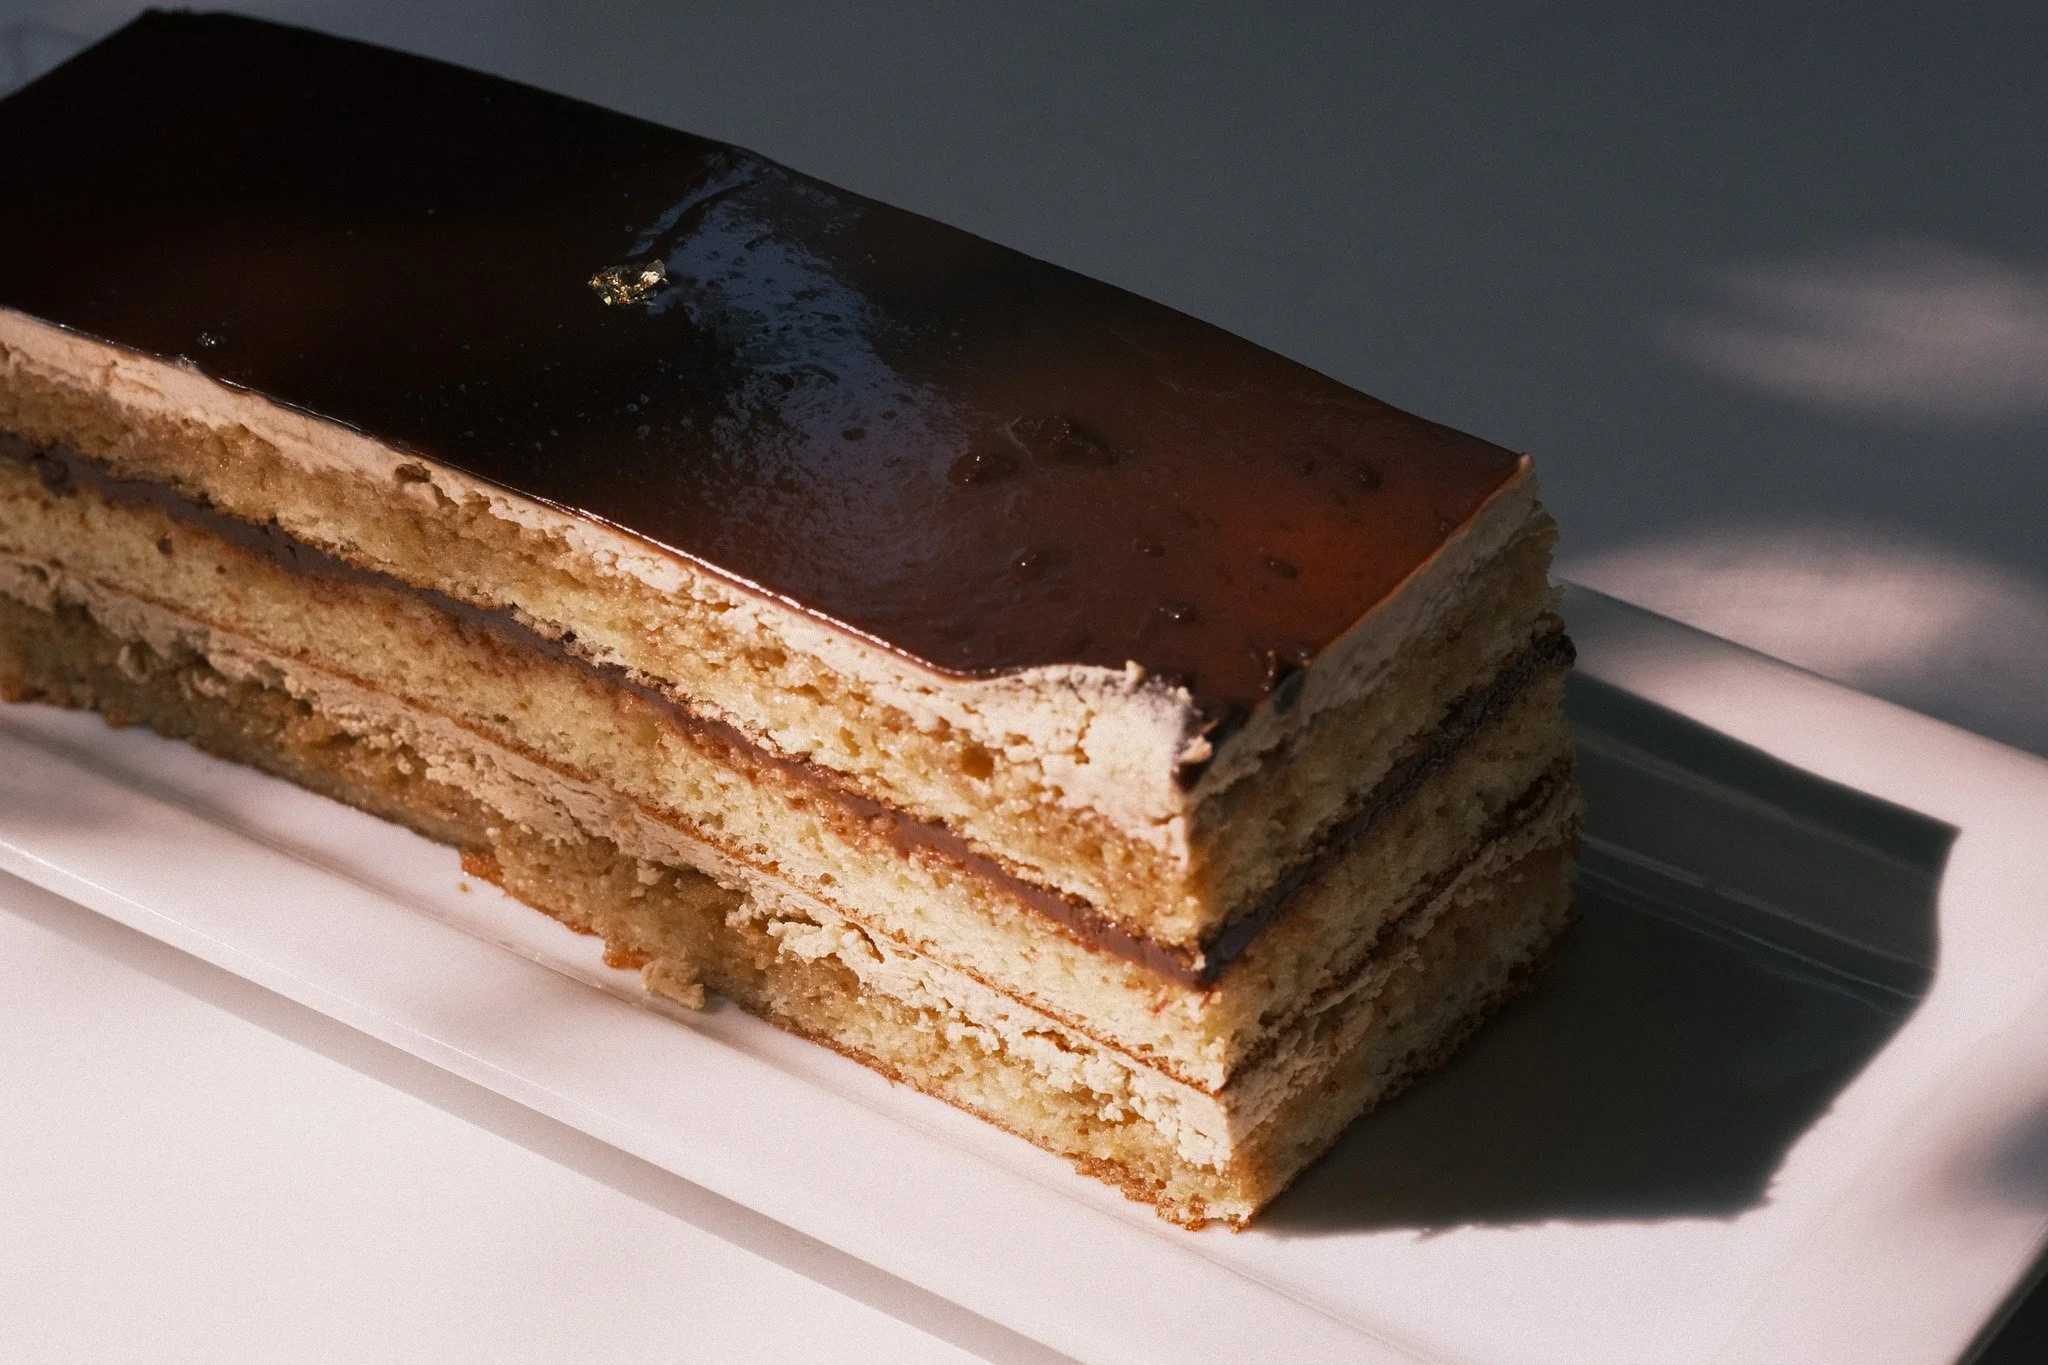
Okay, I’ve given my locker room speech. Corny or not, it’s the mother of all cakes and it takes a little while to come together. But it’s just so, so worth it. The flavors of the chilly layers of almond, coffee, and chocolate all play together like a symphony. In fact, that was exactly what Cryriaque Gavillon’s wife told him when she took the very first bite back in 1955. Loving the idea behind it and how the layers reminded him of the Palais Garnier’s (Paris Opera House) tiers, he decided to name it the “gâteau d’opéra” or “opera cake.” Thanks, Google.
The reason this cake is so beloved yet, so difficult to make is that it was designed to provide the experience of eating a whole cake in one bite. It’s composed of five different types of layers:
Joconde: Almond sponge cake.
Crème au beurre: French buttercream. Infused with coffee and tempered egg yolks. Closer to a pastry cream.
Coffee syrup: Exactly what it sounds like.
Ganache: A thick chocolate cream layer at the heart of the cake.
Glaçage: The chocolate mirror glaze to top it all off.
For simplicity’s sake, I’m going to divide up the recipe and ingredients list into “chapters” so you can follow along and not get overwhelmed like I was.
And by the way? For my recipe, you don’t need to buy any fancy equipment. If you have two 9x13 pans, a pastry brush, a knife, and an offset spatula, you can do this.
Suggested Pre-Reqs (optional)
If you want to go into this recipe a little easier later, a few bakes I’d recommend first are…
Heavenly Vanilla Roll Cake, to learn how to work with sponges a bit better.
Creamy Choco Cornet bread to get a better understanding of custards.
For good measure (and pleasure), I’d also recommend the Virgin Tiramisu for getting a better idea of the right amount of coffee to soak into the cake base.
But hey, optional. If you wanna charge in head first, do it. I did the same thing with souffle castella a little while ago, and the struggle made me so much better. Allons-y!
Before you start…
Word to the Wise is required reading today. I mean it. These tips, hacks, and troubleshoots are the culmination of six months of hair-pulling failure. Reading these will tip the scales between your opera cake becoming a soggy lasagna, or a tea-time entremet from a world-class hotel. Please. Be smarter than me.
Word to the Wise + Troubleshooting
-
Use chocolate chips for the central ganache, and couverture for the glaçage. Couverture chocolate has more cocoa butter and will give you a shinier coat, but stays runnier longer. Chocolate chips have less cocoa butter, and will firm up faster, making it better for a clean, spreadable layer. I recommend Ghirardelli Belgian chocolate wafers for a good shine.
-
Make sure the top of your joconde doesn't have any sticky crumbs before you pull it out. Pause. Anyway, it's a tough balance, but for assembly's sake, it's better for it to be set and almost a little overbaked vs. soggy. If that happens, don't sweat it. The syrup and an overnight rest can essentially très leches it back to life.
-
Make sure your espresso caramel reaches 237 degrees Fahrenheit. Take extra care…amel (I tried), to make sure it reaches this temp to dissolve and caramelize the sugar properly.
Make sure your butter is soft, creamy, and ROOM TEMPERATURE. Avoid using the microwave for this one. Too melty and runny? Split, liquid buttercream. Too cold? Chunky, grainy, awful buttercream. But we can solve both.
If crème au beurre is TOO COLD, CHUNKY, or SEPARATED with butter chunks, no worries. Stir it double-boiler style over a pot of hot water on a stove. It’ll melt back down into a homogenous mixture. Just re-whip for a few seconds.
If crème au beurre is TOO MELTY, also no worries. Put it in the fridge for about 30-40 minutes, and it should firm back up. Just whip it for a few seconds until it gets back into silk buttercream shape.
-
Only pour glaçage at 90-95 degrees Fahrenheit. This is the golden number. Anything hotter will melt your buttercream, anything colder will break or give you a messier, less shiny coating.
AVOID touching the glaçage. If you absolutely need to cover some bald spots, do one smooth spread with an offset spatula. Anything more will create bubbles or indents that’ll mess up your beautiful mirror glaze.
-
Wipe your offset spatula CLEAN in between spreads. Samurai Discipline. Wipe it down between each cut. No blood on your sword. You want each layer of cream or ganache to be as flat, level, and even as possible. Any residual cream will create pores and bumps.
Chill your cake for AT LEAST 2 hours before pouring glaçage. Basically think of it like a tiramisu. It needs time to infuse the beautiful coffee flavors and set the buttercream so it doesn’t turn into a melty mess.
Use a clean, HOT knife to cut. Samurai Discipline. Especially during carving and serving. Run it through hot water, and wipe it down every time you do a cut. Make sure to limit it to one smooth motion.

Instructions
Let’s rock.
Chapter 1: Ganache
Ingredients
⅔ cup heavy whipping cream
⅔ cup chocolate chips
Instructions
Take out 2.5-3 sticks of unsalted butter and leave them on the countertop (for the crème au beurre later).
In a small saucepan, pour in your heavy whipping cream and heat for about a minute. Not boiling or simmering, just warm.
Add in your chocolate. Using a spatula stir and fold constantly scraping down the sides of the pot to avoid burning chocolate (it’s a pain to clean, be vigilant). Keep stirring until the chocolate is fully melted and your ganache is combined.
Take your ganache off the heat, and place it on the counter to cool at room temperature. It’ll set as it cools to make it perfect for spreading.
Chapter 2: Coffee Syrup
Ingredients
1 cup granulated white sugar
1 cup of coffee (instant, espresso, doesn’t matter)
½ tsp vanilla extract
Instructions
Brew 1 cup espresso or coffee. Pour it into a small saucepan over low to medium heat.
Add in 1 cup of sugar. Stir on low heat for 5-7 minutes or until the syrup is slightly thickened and can coat the back of a spoon or spatula.
Remove from the heat and stir in your vanilla extract. Let it cool on the side.
Chapter 3: Joconde
Ingredients
1 ⅓ cup almond flour
1 cup + 2 Tbsp powdered sugar
5 eggs
¼ tsp kosher salt
¼ cup all-purpose flour
5 egg whites
2 Tbsp granulated white sugar
½ tsp cream of tartar
2 Tbsp unsalted butter (¼ stick)
Instructions
Preheat your oven to 400 degrees Fahrenheit. Grease and line two 9×13 baking pans with parchment paper. Melt 2 Tbsp of butter in the microwave in a small dish. Leave this to the side.
Sift your powdered sugar into a large bowl (not a stand mixer bowl). Afterwards, sift in your almond flour.
Add in your salt, butter, and 5 eggs. Whisk until the mixture is creamy and fluffy. Once it’s uniform, sift and stir in your all-purpose flour until just combined. It should fall into thick ribbons.
Separate your 5 egg whites from your yolks. Leave the yolks to the side and leave them out at room temperature. You’ll need these.
In another bowl whip the egg whites and salt until foamy. Add in your cream of tartar here. Gradually add sugar and continue mixing until medium stiff peaks form (should form a “J” on your whisk).
Using a spatula, gently fold in ⅓ of your egg white mixture into your almond flour mix to ensure it doesn’t deflate. Once fluffy and incorporated, gently recombine your mix with the rest of the egg whites.
Divide your batter evenly into your two prepared pans. Brush the tops with an offset spatula to make sure they are level and have nearly identical heights. Tap the pans a few times to get out any air bubbles.
Bake for 8-10 minutes until slightly golden and set. When you check them, touch the tops. If any wet crumbs stick to your finger, give them one more minute. If it feels soft, yet firm, pull them immediately.
Let your cakes cool in the pan for exactly 5 minutes. Immediately grab them by the parchment paper, and flip onto a cutting board, peeling back the parchment.
With a serrated knife, Cut each cake into three equal rectangles. Use a measuring tape if you can. Once finished, transfer each of your cakes to a wire rack for cooling to prevent the steam from sagging them up.
Chapter 4: Crème au beurre
Ingredients
¾ cup granulated white sugar
⅓ cup water
1 Tbsp espresso powder
1 ¼ cup unsalted butter, softened (2.5 sticks)
Instructions
Add your egg yolks from earlier into a heatproof bowl (stand mixer works), and whisk until they are creamy and foamy.
In a small saucepan combine your sugar, water, and instant coffee, and begin stirring constantly over low to medium heat. Using a candy thermometer, measure the temperature of your espresso caramel. When it reaches 237 degrees Fahrenheit.
Constantly stirring your creamy egg yolks, gradually stream in your hot espresso caramel until you get a lukewarm, thick, light brown mix. Keep stirring.
Whisking on low speed, gradually add in your softened butter, mix on low until the butter is incorporated (no specs left). Mix on high speed, until smooth, fluffy, and uniform.
Chapter 5: Assembly & Chill
Instructions
It’s game time. Line a big sheet pan (doesn’t matter what size), with parchment paper. Assemble all of your ingredients: coffee syrup, crème au beurre, 6 cooled jocondes, and ganache. Make sure you have an offset spatula, a pastry brush, a bench cutter (optional), and a roll of paper towels handy.
Loop (2x):
Place down one layer of joconde on your parchment lined sheet. Brush a layer of syrup on top of your joconde until the top of the cake turns a darker brown.
Using an offset spatula, spread a healthy layer of crème au beurre on-top of your brushed joconde. Make sure you don’t use more than ¼ of it. Wiping in between uses, carefully spread your offset spatula across the top of your crème au beurre to make sure it is flat and smooth.
Place down your next layer of joconde and brush it with your coffee syrup again.
Wipe down your offset spatula, and carefully spread an even layer of ganache on top (make sure it’s thick and not runny). Don’t use more than half! Make sure your spatula is wiped in between each spread, and that the top is flat and level.
Put down the next layer of joconde and brush with syrup.
Spread ¼ of your crème au beurre on top with your offset spatula. It is absolutely critical that this layer is flat, smooth, and level on top. So brush your clean offset spatula several times until the top of your layer is completely smooth.
Woof. Good job. If anything is bleeding out the sides, at this point. Don’t worry about it. Transfer your parchment-lined sheet with your cakes to the fridge to chill for at least 2-3 hours.
Chapter 6: Glaçage
Ingredients
1 ⅓ cup heavy whipping cream
1 ½ cup couverture chocolate
2 tsp corn syrup
Instructions
Pull your sheet pan from the fridge with your cakes on top.
In a small saucepan, heat your heavy whipping cream and corn syrup, until it gets warm (almost simmering).
Pour in your couverture chocolate and stir continuously until fully incorporated into a shiny, runny looking ganache. It shook runny, glossy, and reflective.
Take your saucepan off the heat. Using a candy thermometer, let your glaçage cool until it reaches exactly 90 to 95 degrees Fahrenheit. While waiting for it to cool, place a wire rack over a large baking dish. Using 1 or 2 offset spatulas, carefully transfer your cakes onto the wire rack.
Once your glaçage cools to 90 to 95 degrees, carefully pour your glaze over each of your cakes until the entire top is covered with your chocolate. If there are a few bald spots, do no more than ONE spread with a clean offset spatula to cover the top. Any more will ruin the coat.
Let your glaçage set and cool for about 15-20 minutes. Transfer your cakes back to the refrigerator for at least 45 minutes to 1 hour, but ideally overnight.

Chapter 7: Final Assembly
Instructions
Remove your cakes from the fridge. Make sure they sit on top of parchment paper, and have lots of room between them. Run a large knife through hot water, and dry it. Have a roll of paper towels ready.
Between EVERY cut, wipe your blade clean and run it through hot water again. Carefully cut about ¼ inch off each side of the cake in one smooth motion until you can see a beautiful, neatly stacked cross section on each side.
Gather your trimmings into a separate plate (they’re super tasty), and carefully transfer your cakes to their final resting place. If you’d like, you can add on some gold leaf, pipe on a design of ganache, whatever you want.
Serving
Incroyable. You did it! When serving, makes sure to cut each slice with a hot knife, and wipe in between uses. If you have leftovers, make sure to store them in the refrigerator with a cover. Enjoy!
